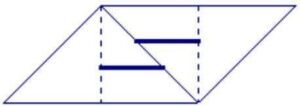
Although creating origami sonobe units is likely to be considered by most to be an essential part of making sonobe polyhedra, a cut-out version of the sonobe module can be used to help beginners learn how to weave the units together.
The unit pictured here can be reproduced multiple times in a document (a PowerPoint slide works well, since you don’t have to worry about margins), and printed onto card stock. Printing onto card stock gives a solid unit to work with, while regular paper will likely be too flimsy.
After printing, cut out each unit and cut slits into them along the bold horizontal lines (a utility blade or exacto-knife works well). Depending on whether you want to hide the printing or not, you can mountain-fold the diagonal line and vally-fold the dotted vertical lines, or vice-versa (all modules should be folded the same).
You will need 6 units for a cube, 12 for an “augmented octahedron”, and 30 for an augmented icosahedron. Models can also be assembled from 3 units (a triangular di-pyramid) 9 units (two fused cubes), and other combinations.
The main idea in creating this module was to create a set of reusable units that could be used in professional development workshops for teachers learning modular origami for the first time. After seeing how the units hold together, the next step is to learn how to fold the units from paper.
To construct smaller modules, simply connect less than 5 units around. A 4 unit base will form the pattern for the augmented octahedron (which will take a total of 12 units). A 3 unit base will form the pattern for the cube (which will take a total of 6 units).
For more such insights, log into www.international-maths-challenge.com.
*Credit for article given to dan.mackinnon*

